If you are trying to get rid of slowness in your computer and have improved performance, in this article, we have shared 10 such awesome tips that can instantly speed up your computer performance. Yes, the way to speed up your computer is to delete temporary files and clear cache in Windows 10 computers.
Before we start, you must know why a computer slows down. In one line, there can be many reasons why your computer is performing slow and the primary reason is the cache and temporary files. By getting rid of the temporary files and cache files on your computer, you can boost your computer performance by many folds.
Temporary files:
Temporary files, as the name suggests, are the files created by the system for temporary use. Whenever you use any application, Windows 10 creates some temporary files to improve the performance of various applications. However, every day hundreds of such files get created. They consume a significant amount of space and slow down your computer performance.
Cache files:
Cache files are the files that are created when you open any application or website for the first time. It improves the performance when you revisit the application or website. Information about the application or website is stored in these cache files. Cache files can be in the form of scripts, images, or multimedia. But over a period of time, these files get accumulated in the system and slow down system performance.
Whenever you feel your system is slowing down then the first thing to do is to delete cache files and temporary files. But you should understand, what are the different cache files and temporary files? Where are they located? How to delete them?
Keep reading this article and follow the steps suggested, to improve your system performance.
Ways to delete temporary files and clear cache in Windows 10:
1. Delete Windows 10 Update files
Step 1: Stop Windows Update Service
Before deleting the Windows update file you need to stop the Windows update service
- Press Windows + R or search Run in the Windows search bar to open the Run dialog.
- Type services.msc and click OK.
Or, you can directly type Services in the Windows search bar. The Services window will open.
- Look for the “Windows Update” service in the list and double click. Service properties dialog will open.
Select Disabled from Startup type as shown below.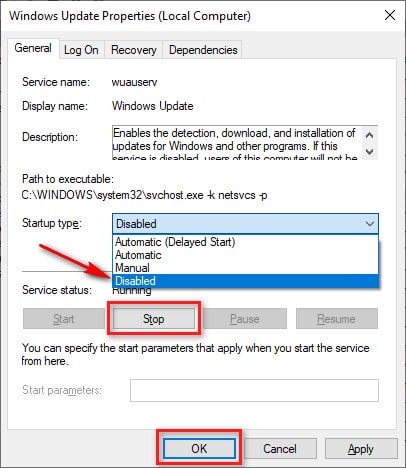
- Click OK to close the services window.
Step 2: Delete updates cache file
- Go to location C:\Windows\SoftwareDistribution\Download and delete all files
Step 3: Start Windows update service
- Again start the service that we disabled in Step 1.
2. Use Disk Cleanup
Windows has its inbuilt Disk clean-up functionality to clean cache and log files in a computer.
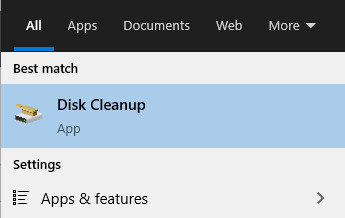
Step 1: Search Disk Cleanup in the Windows search box and select it from the shown list.
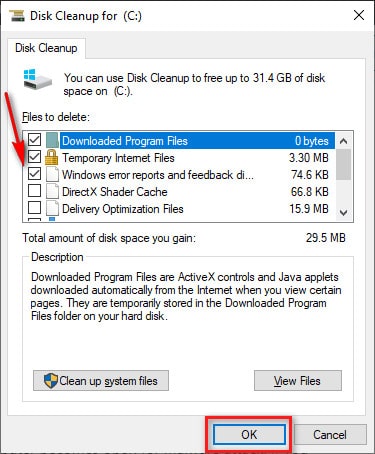
Step 2: Select the drive on which you want to perform Disk Cleanup. This takes a few minutes to search files on the disk. Windows automatically calculates the space that can be freed up.
Step 3: Select the checkbox against the file types you want to delete and click OK.
This is one of the quickest ways to delete cache in Windows 10 laptops or desktops.
3. Delete Temporary Files
Deleting temporary files is a must approach if your computer is slow running any version of Windows. Follow the below steps to search and delete temporary files manually.
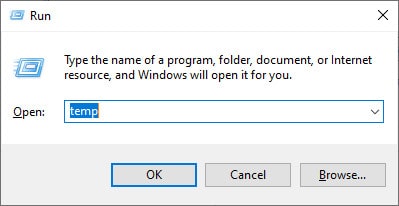
Step 1: Press Windows + R or Search for Run in the Windows search bar to open the run window.
Step 2: Type %temp%

Click OK or press Enter key. This command will fetch all files and folders available in the Temp folder.
Step 3: Select all files using Ctrl + A and press Shift + Delete to permanently delete these files.
A pop-up prompts for the confirmation, click Yes.
Step 4: Again open the Run dialog by pressing Windows + R or searching Run in the Windows search bar.
- Type temp in the Run dialog and click OK.
- It opens the Windows → Temp folder.
- Select all files using Ctrl + A and delete permanently using Shift+ Delete.
Note: Sometimes your computer may not allow deleting some files because they might be used in any application, services, or opened in any folder. You may get the following error message in this situation.
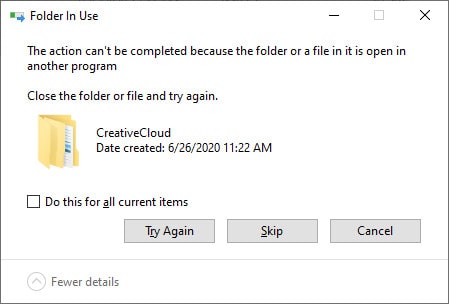
In this error message, you will get information about the service, application, or folder in which a particular file is opened. You can close that application or services then try deleting again.
The best way to clear the temporary files is to restart the computer and then delete the temporary files; you will not get any error message.
4. Delete Browser Cache
If your internet browser is slow or you are facing issues while connecting to web pages then delete the browser cache and try again.
Steps to delete the browser cache are dependent on the type of browser you are using. Here we will explain the steps to delete browser cache for Google Chrome, Internet Explorer and Mozilla Firefox.
Google Chrome:
Read: Clear cache in Chrome – a step by step guide with images
- Close all Google Chrome windows and Open a new window.
- Click on three dots in the rightmost corner. A long drop-down window will open.
- Click on Settings.
- Click on Privacy and Security.
- Click on “Clear Browsing Data”.
- In the Clear browsing data window, select Time range and select the type of data you want to delete
- Click on Clear data
Internet Explorer:
Step 1: Close all Internet Explorer windows and open a new window.
Step 2: Go to Tools, which is available in the right-most corner, gear like icon, and select Internet Options.
Step 3: The Internet Options dialog will open. Under the General tab, click on the Delete button.
Step 4: Delete Browsing History window will open. Select files you want to delete and click on the Delete button.
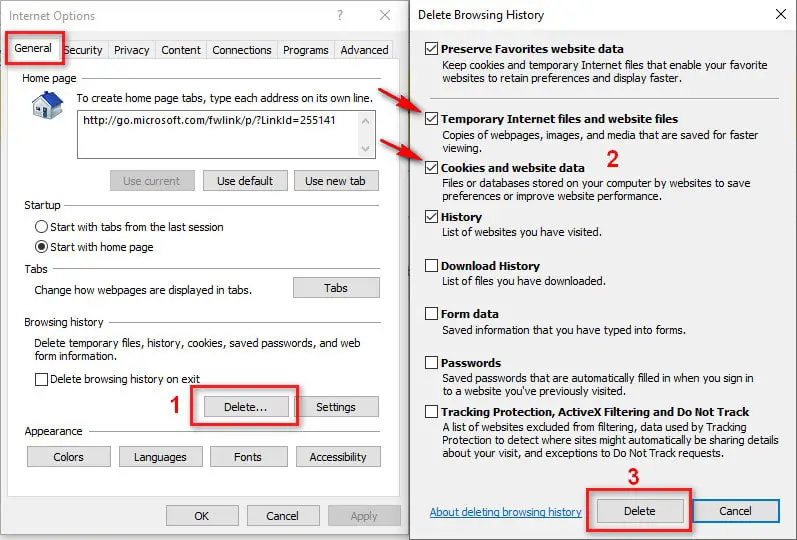
Note: If you want to automatically delete browsing history when you close the window then select the “Delete browsing history on exit” checkbox in the Internet Options dialog.
Mozilla Firefox:
Step 1: Close all windows of Mozilla Firefox and open a new window.
Step 2: Click on the Menu button and select Options.
Step 3: Click Privacy and Security.
Step 4: Select Clear Data in the Cookies and Site Data section.
Step 5: Clear data window will open. Select the respective checkbox you want to delete and click on Clear.
Note: If you want to automatically delete the browsing cache then go to the “Privacy and Security” section. In the Firefox dropdown, select “Use custom settings for history”. Select checkbox “Clear History when Firefox closes” and click OK to close Settings.
5. Delete Thumbnail and Icon cache
Windows computer creates thumbnail and icon cache to speed up the loading of the folders onto your system. Deleting these cache files will boost your computer’s performance.
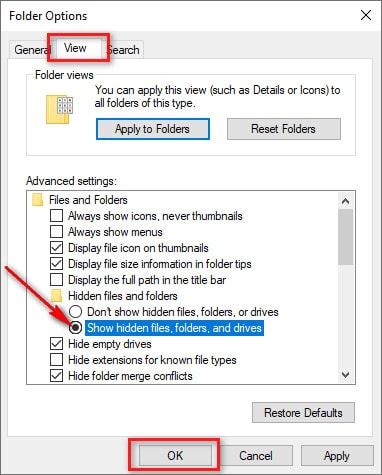
Step 1: Show hidden files
- Open Folder Options by searching in the Windows search bar.
- Under the View tab, select the radio button “Show hidden files, folders, and drives”
- Click OK to set the preference.
Step 2: Delete cache files
Navigate to C:\Users\<local_user>\AppData\Local\Microsoft\Windows\Explorer location.
Select all files to begin with iconcache and thumbcache and press Shift + Delete to permanently delete these files.
Note: You can also use the Disk Cleanup utility to clear the thumbnail cache.
6. Delete Restore Points
The restore points consume lots of space in the system and can degrade the system performance. You can delete older restore points. There can be two scenarios of deleting the restore points.
Scenario 1: Delete all restore points
- Select “Create a Restore Point”, by searching in the Windows search box. In the System Properties window, select the “System Protection” tab and click on Configure.
- Click on the Delete button to delete all the restore points (this includes system settings and previous versions of files).
- Click OK to close the window.
Scenario 2: Delete all restore points except the latest
You can delete all previous restore points except the latest one to save space. For this, you need to use the inbuilt Disk Cleanup feature of Windows.
- Using the Windows search box, search, and open Disk cleanup.
- Select a drive where you have stored your restore points.
- Under the “More Options” tab, click on the Clean-Up option in the “System Restore and Shadow Copies” section. Choose Delete in the confirmation pop-up window.
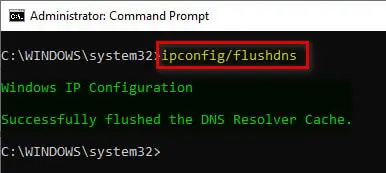
7. Clear DNS Cache
Domain Name System (DNS) cache stores domain names and IP addresses of recently visited websites that help to fetch a webpage faster when you revisit it.
- To clear DNS cache, open the command prompt in admin mode and type ipconfig/flushdns in the command prompt.
- Press Enter key.
8. Delete temporary files using Windows 10 storage sense
Step 1: Open Windows Settings.
Step 2: In the Windows settings select System.
Step 3: From the left menu select Storage and click on “Configure Storage Sense or run it now”.
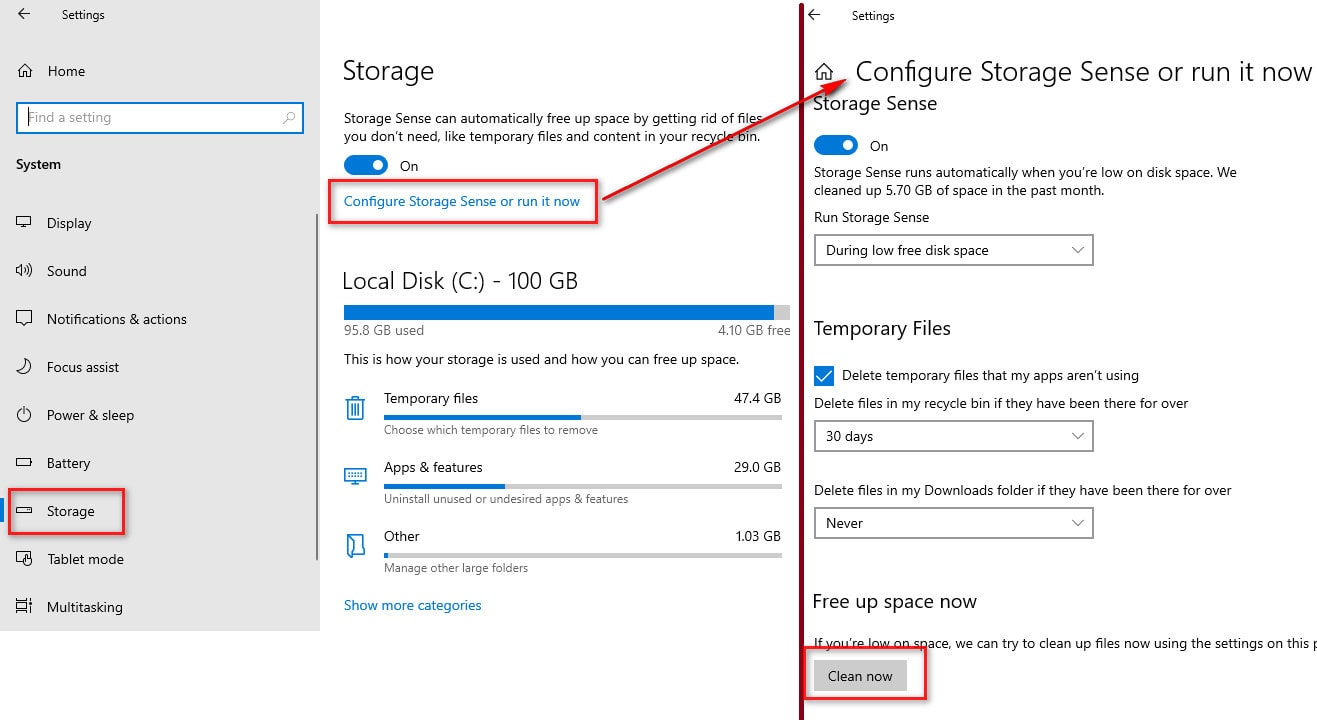
Step 4: Click on “Clean now”.
If you want to clear cache in Windows 10 automatically, then select the check-box “Delete temporary files that my apps aren’t using“.
9. Delete Windows Store Cache
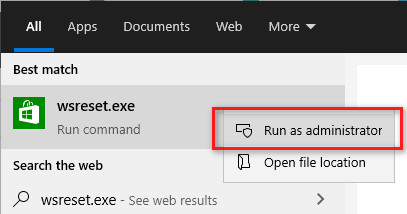
- Open command prompt in admin mode.
- Type wsreset.exe and press Enter. This clears the Windows store cache.
- Or, you can also search winreset.exe in the Windows search box.
- Select winreset.exe from search results, right-click and select Run as administrator.
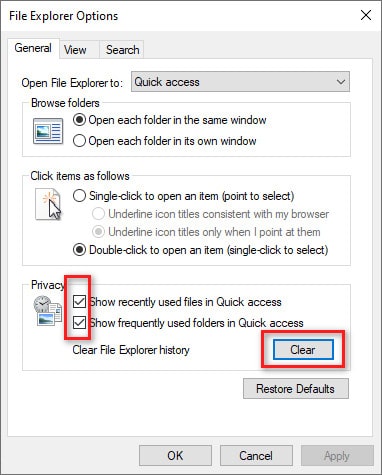
10. Delete File Explorer History
- Search and open “File Explorer Options” using the Windows search box.
- Under the General tab click on the Clear button to clear file explorer history.
- Make sure you checked both checkboxes in the privacy section.
Final Words:
Okay.. that’s all the possible ways to clear cache in Windows 10 computer. I am sure, using these techniques you will be able to delete all temporary and cache files from your system.
Do share your experience in the comment section below, how your computer’s performance spiked up after performing the above steps.
Cheers !!!
