The Telnet client is installed by default in older versions of Windows and but in Windows 10/8/7, the functionality must be enabled manually prior to using the telnet command. There are multiple ways to enable Telnet in Windows which include enabling telnet from the control panel, from the command prompt, and from PowerShell.
Telnet protocol is used to troubleshoot server connectivity over a particular port and execute commands on the target hostname. The connection using telnet is bi-directional.
Ways to enable telnet in Windows:
1. Enable telnet from control panel/Windows settings
- Search for “Turn Windows features on or off” in the Windows search bar.
You can also go to “Control Panel” and select the “Program” option.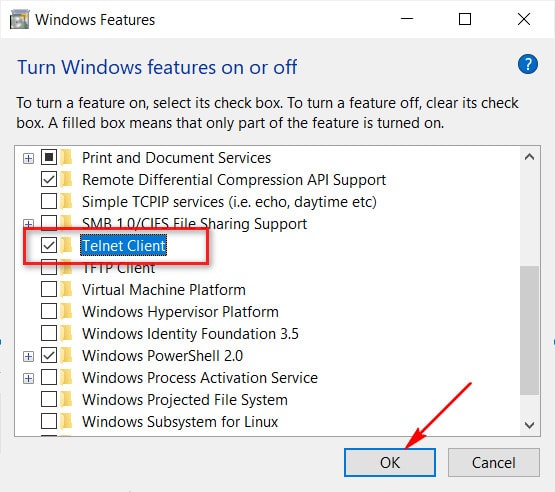
- The “Windows Features” panel opens. Look for the “Telnet Client” and select the checkbox.
- Click on “OK”
- Windows takes a few moments to configure and enable the Telnet client on your computer.
- Close the confirmation window and you are all set to use the Telnet client.
2. Enable telnet from command prompt
Enabling the Telnet client in the command prompt is quite simple and here are the steps to do so.
- Open command prompt in admin mode
- Type the command below and press Enter.
pkgmgr /iu:”TelnetClient”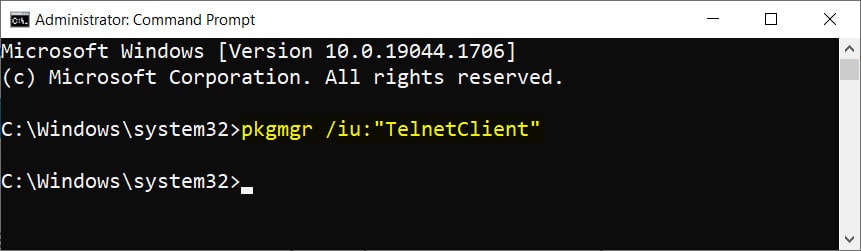
- cmd screen does not show any message but telnet gets installed, close the command prompt window.
3. Enable telnet from Powershell
- Open the Powershell in Admin mode.
- Type the command below and press Enter.
dism /online /Enable-Feature /FeatureName:TelnetClient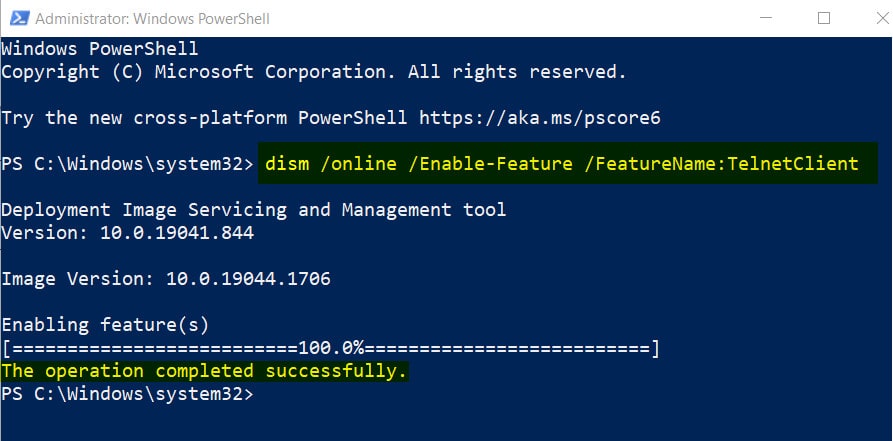
- Close the Powershell window and you’re all set.
How to check if telnet is installed successfully or not?
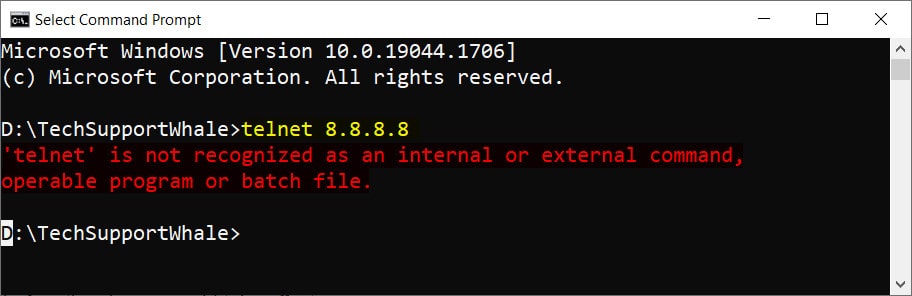
To check if telnet is installed or not on your computer, you can use the telnet command with the target IP address and port in the format telnet <IP address/Hostname> <Port>.
telnet 8.8.8.8 853
If the telnet client is not installed, you will receive ‘telnet’ is not recognized as an internal or external command, operable program or batch file.
If the telnet client is installed, you get a blank command prompt screen that means you are able to connect to the IP address/hostname on the specified port.
How to disable telnet client:
To disable the telnet client already installed on your machine, you can go to the “Turn Windows features on or off” option and uncheck the checkbox “Telnet Client“.
Also, you can run the below command in Powershell with elevated access (i.e. admin mode).
dism /online /Disable-Feature /FeatureName:TelnetClient
Final words:
Since the telnet connection is bi-directional, be careful which server you are connecting to. There is a possibility, one can ping back to your computer while a telnet connection is open. In this example, we have used Google’s public IP address for reference, you can try them out.
That’s all about the possible ways to enable telnet in Windows 10. Do let us know in the comments section if you need any help in this process, we will try out best to help you out.
Cheers!!
