If you are getting the error “AMD-V is disabled in the BIOS” while accessing a virtual machine or while creating a virtual machine, then it is highly likely that the virtualization is disabled on your computer.
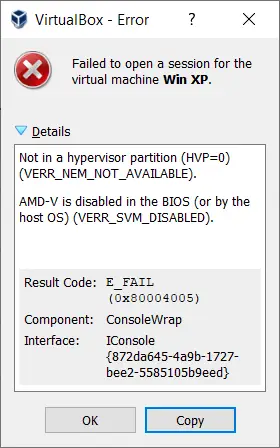
Failed to open a session for the virtual machine Win XP.
Not in a hypervisor partition (HVP=0) (VERR_NEM_NOT_AVAILABLE).
AMD-V is disabled in the BIOS (or by the host OS) (VERR_SVM_DISABLED).
Result Code: E_FAIL (0x80004005)
Component: ConsoleWrap
Interface: IConsole {872da645-4a9b-1727-bee2-5585105b9eed}
Virtualization is a technology that enables your computer to run a virtual machine that can run any operating system on top of your current operating system. The virtual machine utilizes your resources such as processor, memory on the host computer to run the VM.
But, you need to enable Virtualization in BIOS in order to create or run any virtual machine on your computer or laptop. Here are the steps to enable virtualization on laptops/computers running on AMD.
Note: We are enabling AMD virtualization on Acer Nitro 5 but the steps are applicable to all laptops/computers running on AMD. The only point you need to look for is the key to enter into BIOS mode to make the changes that may vary from laptop to laptop and model to model.
Steps to fix AMD-V is disabled in the BIOS (VERR_SVM_DISABLED):
- Enter BIOS mode by pressing and holding the F2 key. You need to enter the key before the boot starts.
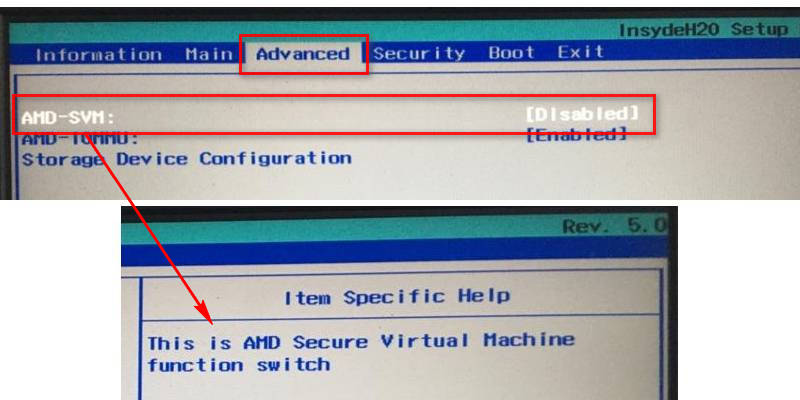
Note: The key to enter the boot screen varies from computer to computer. I am having an Acer Nitro 5 laptop and F2 is the key, but in your case, it might be F12, F10, or F9. - Once you are in BIOS mode, go to the Advanced tab.
- Look for the option AMD-SVM under the Advanced menu which is set as Disabled by default.
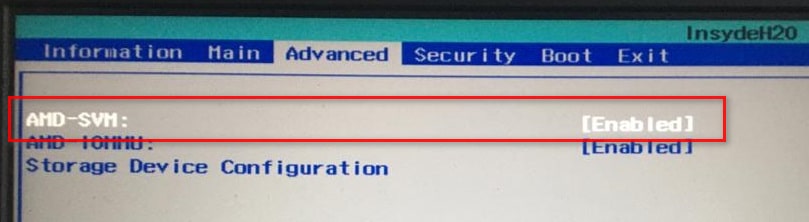
- While on the AMD-SVM option, press Enter and choose Enabled; press Enter again to set it enabled.

- Now that the virtualization is enabled, press F10 to save the changes and exit from BIOS mode. Select Yes to confirm.

- Virtualization (AMD-SVM) is now enabled on your laptop.
Once you exit from the BIOS mode, Windows automatically restarts and the virtualization is now enabled on your laptop/desktop.
That’s all the steps you need to fix AMD-V is disabled in the BIOS (VERR_SVM_DISABLED) and enable Virtualization on AMD computers.
Enjoy running your virtual machine, cheers !!
Related articles:
1. Enable Virtualization on Lenovo laptop
2. What is a Hypervisor? Type 1 vs Type 2 Hypervisor
3. Make VirtualBox Full Screen from windowed mode
