Metadrive is a Google Drive add-on that manages your files and folders in Google drive providing an efficient way of searching throughout your data. If you prefer arranging data perfectly, I can assure you this Metadrive tutorial is going to help you a lot.
How to install Metadrive:
You need to download Metadrive add-on from the G Suite marketplace or from the official website.
- Open G Suite Marketplace or the official website.
- Search for Metadrive in the search bar.
- Click on the search result showing the add-on with Metadrive name (the first result).
- Click on the install button to integrate the add-on with your Google drive.
Before you can use the Metadrive extension, you have to agree to the GDPR Privacy Policy and grant full access to your files, folders, and other required permissions. If you do not want to grant permission to access your data, then you will not be able to use this add-on.
How to use Metadrive:
Metadrive, you can say is an extension of Google drive features with many more advanced functionalities to manage your data in a better way. When you start using Metadrive, you will be using its customized interface rather than the Google drive where the functionalities are limited.
To start using Meta-drive, right-click on any folder in your google drive and then select Open with → Metadrive. The Metadrive user interface opens.
Best features of Metadrive add-on:
1. Add custom properties and metadata to files and folders:
You have the capability to add custom properties to your files and folders based on your requirement. Metadrive provides almost all types of property types to be available on your data. The more you utilize the custom properties, it will be easier to search through the data, create a grouping that we will discuss a little later.
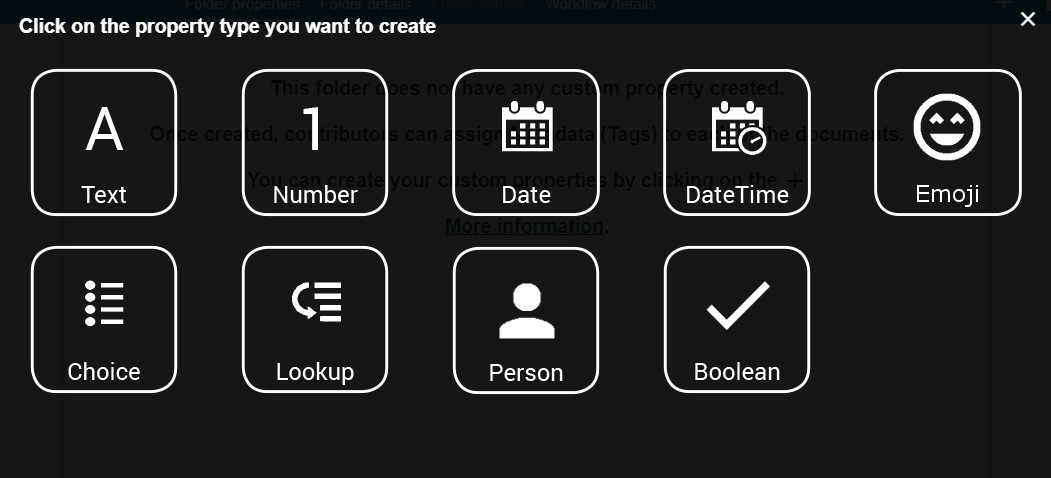
To add a new custom property type to your documents, follow the below steps. In the example below, we will see how to add a Text type custom property.
- Open any folder with files in it (with files it will be easier to understand).
- Click on the “Folder properties” gear icon
 .
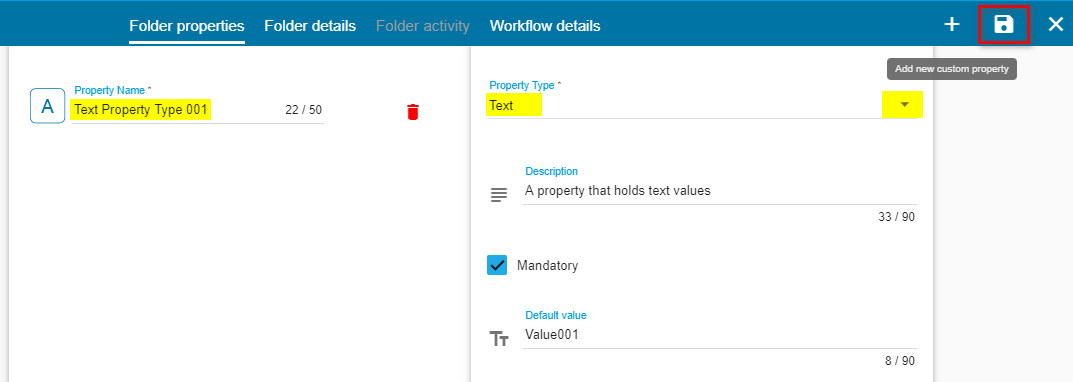
. - Give the new property a name under the “Property Name” field.
- Choose a property type from the drop-down list. As an example, we will select a text type property.
- You can mark the property as Mandatory by selecting the check-box and fill other details like description or the default value or the property.
Follow the same process to add as many properties as you want. Here is an example of how it looks after adding multiple properties.
To edit a property for a file, click on the pencil icon before the file and edit the values. You can also achieve this by right-clicking on a file and selecting “Edit Metadata” and then save the changes.
2. Flat search and filter:
Metadrive has the capability to search through folder hierarchies and also can search the metadata of a file. Use the global search to fetch any files which contain the search keyword in the file name or property name.
Apart from the global search, the add-on has the feature to search a keyword in a single column. Use the search box on the header to find out files based on your search criteria. You can say this acts as a filter for your data.
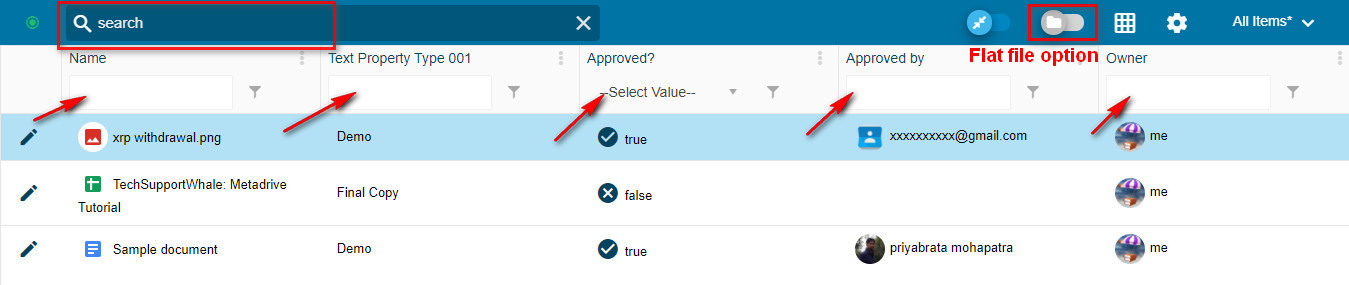
Use the “Flat file option” to see all the files in the current folder and all the sub-folders directly. This hides all the sub-folders but displays only the files in it.
3. Arranging and editing columns:
Customize the column arrangements. Add/Remove columns with your custom property. You can sort the files list based on your column value. Drag and drop a column to any position to reposition it.
4. Grouping:
Metadrive can group your files based on a custom property or any available property on your files. To group your files, follow the below steps:
- Toggle the “Enable grouping” from the top bar.
- Once the button is enabled, a new ar appears just below the top bar.
- Drag and drop the column on which you want to apply grouping. You can drag and drop multiple columns to have a nested grouping.
- Click on the “Collapse groups” or “Expand groups” buttons to collapse and expand all groupings in one shot.
Is not this amazing?
5. Create custom views:
If you want to save any column configuration for your files in Google Drive, you can do so by creating custom views in the Metadrive add-on. The best thing about creating views is that you can preserve your search criteria and other column configurations like filters, column search, sorting in the custom view. Here are the steps to create, edit, and delete custom views in Metadrive.
- Arrange your files the way you want them to be displayed (apply filters, grouping, re-arrange columns, or any specific way you want).
- Go to “All Items” drop-down list and choose “Add new view“.
- Give your view a name to save the current options.
- Enable the toggle button if you want to save the view as the default view.
- Click on the save icon on the top right corner to save the view. As soon as you create a view, it is applied to your data.
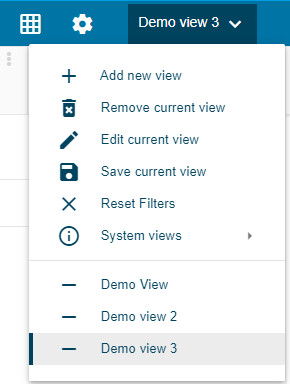
- You can apply different views by clicking on the current view and then selecting the one you want. In the below screenshot, I have created 3 views and Demo view 3 is the current view. Select any other view in the list to make that as current.
- To delete a view, click on the view name and then select “Remove current view“. In order to delete a view, first, make that view as current.
- To edit a view, click on the current view and select “Edit current view“. Only the current view can be edited. So, to make changes to other views set them as current first.
Read also: [Full Tutorial] MetaRover – A G Suite Add-on
6. Create G Suite documents or upload from local drive:
You can create various G Suite documents from Metadrive as well. This includes Google Docs, Google Sheets, Google Slide, Google Drawings, Google Forms, Folder along with the feature to upload files from local drive and import from Google Drive.

While creating or uploading a new file, you are prompted to fill in the custom properties on each file.
7. Edit in Datasheet:
Metadrive provides the capability to edit the metadata and other properties in bulk. Click on ![]() icon that opens the files in datasheet mode. You can fill the cell values the way you fill for Google Sheets or Excel sheet.
icon that opens the files in datasheet mode. You can fill the cell values the way you fill for Google Sheets or Excel sheet.

Final thoughts:
Metadrive, the Google Drive add-on is an amazing extension of the native Google Drive functionalities. It provides a more advanced way of managing and organizing data with custom properties and configurations. It’s been a long time, I have been using the Metadrive add-on and I have not used Google Drive for past few months. I say from my experience that the Metadrive add-on gives an impression of the SharePoint tool.
If you are trying to manage your Google Drive files and folder to make it searchable and accessible in a better way, you can try Metadrive and if you are already using Metadrive, do share your experience and let everyone know which feature you liked the most.
I hope this Metadrive tutorial is helpful to you. Cheers !!!
